С in лун programming
 Developer
Key-Value Coding Programming Guide

About Key-Value Coding
Key-value coding is a mechanism enabled by the NSKeyValueCoding informal protocol that objects adopt to provide indirect access to their properties. When an object is key-value coding compliant, its properties are addressable via string parameters through a concise, uniform messaging interface. This indirect access mechanism supplements the direct access afforded by instance variables and their associated accessor methods.
You typically use accessor methods to gain access to an object’s properties. A get accessor (or getter) returns the value of a property. A set accessor (or setter) sets the value of a property. In Objective-C, you can also directly access a property’s underlying instance variable. Accessing an object property in any of these ways is straightforward, but requires calling on a property-specific method or variable name. As the list of properties grows or changes, so also must the code which accesses these properties. In contrast, a key-value coding compliant object provides a simple messaging interface that is consistent across all of its properties.
Key-value coding is a fundamental concept that underlies many other Cocoa technologies, such as key-value observing, Cocoa bindings, Core Data, and AppleScript-ability. Key-value coding can also help to simplify your code in some cases.
Using Key-Value Coding Compliant Objects
Objects typically adopt key-value coding when they inherit from NSObject (directly or indirectly), which both adopts the NSKeyValueCoding protocol and provides a default implementation for the essential methods. Such an object enables other objects, through a compact messaging interface, to do the following:
Access object properties. The protocol specifies methods, such as the generic getter valueForKey: and the generic setter setValue:forKey: , for accessing object properties by their name, or key, parameterized as a string. The default implementation of these and related methods use the key to locate and interact with the underlying data, as described in Accessing Object Properties .
Manipulate collection properties. The default implementations of the access methods work with an object’s collection properties (such as NSArray objects) just like any other property. In addition, if an object defines collection accessor methods for a property, it enables key-value access to the contents of the collection. This is often more efficient than direct access and allows you to work with custom collection objects through a standardized interface, as described in Accessing Collection Properties .
Invoke collection operators on collection objects. When accessing a collection property in a key-value coding compliant object, you can insert a collection operator into the key string, as described in Using Collection Operators . Collection operators instruct the default NSKeyValueCoding getter implementation to take an action on the collection, and then return either a new, filtered version of the collection, or a single value representing some characteristic of the collection.
Access non-object properties. The default implementation of the protocol detects non-object properties, including both scalars and structures, and automatically wraps and unwraps them as objects for use on the protocol interface, as described in Representing Non-Object Values . In addition, the protocol declares a method allowing a compliant object to provide a suitable action for the case when a nil value is set on a non-object property through the key-value coding interface.
Access properties by key path. When you have a hierarchy of key-value coding compliant objects, you can use key path based method calls to drill down, getting or setting a value deep within the hierarchy using a single call.
Adopting Key-Value Coding for an Object
In order to make your own objects key-value coding compliant, you ensure that they adopt the NSKeyValueCoding informal protocol and implement the corresponding methods, such as valueForKey: as a generic getter and setValue:forKey: as a generic setter. Fortunately, as described above, NSObject adopts this protocol and provides default implementations for these and other essential methods. Therefore, if you derive your objects from NSObject (or any of its many subclasses), much of the work is already done for you.
In order for the default methods to do their work, you ensure your object’s accessor methods and instance variables adhere to certain well-defined patterns. This allows the default implementation to find your object’s properties in response to key-value coded messages. You then optionally extend and customize key-value coding by providing methods for validation and for handling certain special cases.
Key-Value Coding with Swift
Swift objects that inherit from NSObject or one of its subclasses are key-value coding compliant for their properties by default. Whereas in Objective-C, a property’s accessors and instance variables must follow certain patterns, a standard property declaration in Swift automatically guarantees this. On the other hand, many of the protocol’s features are either not relevant or are better handled using native Swift constructs or techniques that do not exist in Objective-C. For example, because all Swift properties are objects, you never exercise the default implementation’s special handling of non-object properties.
Therefore, while the key-value coding protocol methods translate straightforwardly to Swift, this guide focuses primarily on Objective-C, where you need to do more to ensure compliance, and where key-value coding is often most useful. Situations that call for a significantly different approach in Swift are noted throughout the guide.
For more information about using Swift with Cocoa technologies, read Using Swift with Cocoa and Objective-C (Swift 3) . For a complete description of Swift, read The Swift Programming Language (Swift 3) .
Other Cocoa Technologies Rely on Key-Value Coding
An object that is key-value coding compliant can participate in a wide range of Cocoa technologies that depend upon this kind of access, including:
Key-value observing. This mechanism enables objects to register for asynchronous notifications driven by changes in another object’s properties, as described in Key-Value Observing Programming Guide.
Cocoa bindings. This collection of technologies fully implement a Model-View-Controller paradigm, where models encapsulate application data, views display and edit that data, and controllers mediate between the two. Read Cocoa Bindings Programming Topics to learn more about Cocoa Bindings.
Core Data. This framework provides generalized and automated solutions to common tasks associated with object life cycle and object graph management, including persistence. You can read about Core Data in Core Data Programming Guide.
AppleScript. This scripting language enables direct control of scriptable apps and of many parts of macOS. Cocoa’s scripting support takes advantage of key-value coding to get and set information in scriptable objects. The methods in the NSScriptKeyValueCoding informal protocol provide additional capabilities for working with key-value coding, including getting and setting key values by index in multi-value keys and coercing (or converting) a key-value to the appropriate data type. AppleScript Overview provides a high-level overview of AppleScript and its related technologies.
Источник
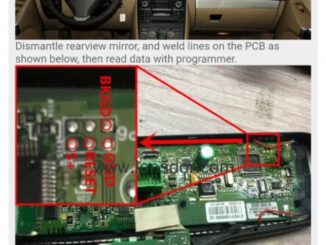
Car Key Programmer
vailable with a wide range of car key programmer if lost your car key; also with some car key copier if you want to make a copy of a car key with the old key. Supplying some car key programmer that works with dozens of cars made, also owing some purposely-designed car key maker for BMW and Mercedes Benz, like AK300 BMW CAS key maker, AK90 BMW EWS key programmer, AK500 programmer both for Mercedes Benz and BMW.

How to program Peugeot 508 2013 all smart keys lost?
2013 Peugeot 508 smart key system all lost. What key programmer to use and how to do? Xhorse VVDI2 / Key Tool Plus, Lonsdor K518ISE, x100 pro are all verified working fine.

Can Xhorse Toyota 8A Non-Smart key AKL Adapter Work with Key Tool Plus?
Question: can Xhorse Toyota 8A Non-Smart key AKL Adapter work with VVDI Key Tool Plus? Look at the 8A control box cable (for all keys lost) […]
Volvo XC90 2005 All Keys Lost Programming with Lonsdor + VVDI Prog
Have Volvo XC90 2005 with all keys lost, how to do this job ? Can any tool do it via obd or not? If I […]

2017 Toyota Levin 8A H Blade Key AKL by OBDSTAR X300DP Plus
OBDSTAR new update Toyota IMMO to V32.45,Support 8A H non-smart transponder no need to disassemble or replace the immo box all keys lost programmming for […]

(Fixed )Xtool X100 PRO2 USB cable not recognize the machine
Good afternoon, following my order on 2020, I updated my Xtool X100 PRO2 and since I am not able to open the Eeprom program, it was writing […]

Lonsdor K518 JLR License is available for all FK72 HPLA AKL?
Lonsdor K518 JLR super update AKL programming under alarm state for 2015 – 2018 Land Rover & Jaguar. Is the JLR License available for all software […]

Program BMW EWS3 key by AK90 plus + VVDI Key Tool Plus
Good morning folks, I have BMW EWS3 with Original chip PCF 7931 (ELM), today I want to have fun with Xhorse VVDI Key Tool Plus […]

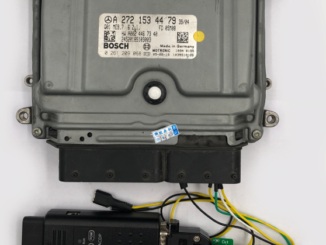
Autel IM608 PRO G-BOX2 OBD program Mercedes 2008 – 2014 All Keys Lost
Today, we’re going to be doing the key for 2008 Mercedes Benz C300 RK (2008- 2014 year Mercedes) all keys lost via OBD using AUTEL […]

Can Autel MaxiIM IM608 read ABS on 99 Dodge Dakota?
Question: I have Autel MaxiIM IM608 and trying to read ABS on 99 Dodge Dakota and scanner says I need Chrysler ccd adapter? Can you […]

Can Autel IM508 + XP400 Pro add smart key to Jaguar f-pace 2018 via OBD?
Problem: Autel IM508 + XP400 Pro can’t add a smart key to the Jaguar f-pace 2018,can not decode vin and manually also does not work on obd, I already upload the data to Autel server. Reply: Autel IM508 + XP400 Pro can add smart key for this car via dump instead of […]

Autel IM508/IM608/IM608 Pro New Update in May,2021
Autel IM508/IM608/IM608 Pro New Update in May,2021: 1.”Read PIN” function for Opel engine A12XER, A14XER and A16XER 2.All keys lost of transponder 47 smart card […]
Yanhua Mini ACDP Module 18 Mercedes-Benz DME/ISM Refresh Operation Guide
Update: Yanhua Mini ACDP Module 18 Mercedes-Benz DME/ISM refresh, no soldering, no risk. Module 18 function: Support Mercedes Benz DME refresh for: CR3.XX/CR4.XX/CR5/CR6/CR60.XX/SIM271DE2.0/SIM4LKE/SIM271KE2.0/CRD.11/CRD2.XX/ME9.7/MED17.7.X/SIM266 etc. Support […]

Where to check 96bit 48 token for Xhorse Key Tool Plus?
This article is available with the method to check if 96bit 48 token is added successfully for Xhorse Key tool plus, No matter if you buy […]

Autel IM508: how to precode and cypher mode for PCF7946 Renault?
Autel IM508 Plus XP400 Pro Key Programmer Question: On used Renault remote key-one button I replaced IC PCF7946. I would need advice on how to implement precode and cypher mode for PCF7946 Renault now. Autel Engineer replied: please download the software of Video 1.00 then go to menu Academy-> […]

Autel IM508+XP400PRO+APB112+G-BOX2: 95% Coverage Key Programming
Autel IM508+xp400 pro+apb112+gbox2 will get you like 95% coverage on all kinds of key programming. The tool will do way more than you can do […]

Lonsdor K518 Volvo Super Update: Support Lastest Volvo Key Programming
Lonsdor K518 key programming Volvo Super Update on May 14th,2021: Support Lastest Volvo data reading and programming for XC40(2020-), XC60(2018-), XC90(2015-), S60(2020-), S90(2017-), V60(2018-), V90(2016-). […]
Источник
Securing API Keys in Android App using NDK (Native Development Kit)


Securing API keys in Android application has become a challenging by traditional methods (storing them in strings.xml or in Gradle etc.), since they can be easily exposed by reverse engineering the app. It may lead to privacy issues and also may affect the billing for third party paid API access.
Though its not possible to fully protect this API keys from reverse engineering but we can make extra laye r for security by using NDK in our app.
The NDK (Native Development Kit) allows to write code in C/C++ in our app. And the good news is that ndk libraries can not be decompiled easily which make the APIs harder to find.
Today, We are going to store API keys in the native C/C++ class and accessing them in our Java classes. Now Let’s started:
Requirements
To compile and debug native code for our app, we need the following components:
The Android Native Development Kit (NDK):
a set of tools that allows to use C and C++ code with Android.
CMake:
an external build tool that works alongside Gradle to build your native library. You do not need this component if you only plan to use ndk-build.
the debugger Android Studio uses to debug native code.
You can install these components using the SDK Manager:
- From an open project, select Tools > Android > SDK Manager from the menu bar.
- Click the SDK Tools tab.
- Check the boxes next to LLDB, CMake, and NDK, as shown in below figure:

Two ways for using NDK: ndk-build, CMake
- NDK is a collection of compilers and libraries that are needed to build C/C++ code for android.
- ndk-build and CMake both use the NDK and solve the same problem.
— — CMake:
- CMake is a new way and the default build tool for using ndk. If we are creating new native library , then we should use CMake.
— — ndk-build:
- Android studio also support this ndk-build(this is a build system included in NDK) due to the large number of existing projects that use the build toolkit to compile their native code.
- It uses android.mk files. in other way we can say android.mk file contains ndk-build.
- If you use CMake then you don’t need Android.mk instead you will need CMakeList.txt
CMake or ndk-build .
- If you’re not familiar with either or your project is cross platform, CMake is probably the better choice. Because CMake’s main advantage is that you can use one set of build files for all your targets (Android, Linux, Windows, iOS, etc).
- ndk-build should be preferred if you’re building a project that already uses Android.mk files for its build system (legacy projects).
***Securing Keys using ndk-build…(Item-01)
step 01: Create a folder “jni” under src/main.
step 02: Create a file ‘Android.mk’ under “jni” folder with following content:
step 03: Create another file ‘Application.mk’ file under “jni” folder with the following content:
Here, This is for setting different Application Binary Interface or ABI. More details can be found at Application.mk.
step 04: Create the C/C++ file “keys.c” under “jni” folder. Add the following content to it:
- “Java_com_shishirstudio_ndktest_MainActivity_getFacebookApiKey”: represents the Java code with package name “com.shishirstudio.ndktest” [ dot(.) must be replaced with underscore(_)]followed by Activity name “MainActivity” where we want to call the native function and the static method “getFacebookApiKey” to fetch the API key from the native function. So the combination is:< Package Name>_
_ - In the above code, I have encoded the actual API key using Base64 encoding (You can store actual API key) for making another security layer.

step 05: Add a static block and load the library ‘keys’ in the activity where you will access the keys. (In our case in MainActivity).
step 06: We also have to add member functions of type “native” to access the keys from the C/C++ file. Since we stored 2 keys, we will declare 2 functions:
step 07: Now access the keys in the code like:
step 08: Oh ! one more things, to compile or make the native build using NDK, don’t forget to add entry into the gradle file:
step 09: Now, sync and build the project. And you will find everything is ok….
***Securing Keys using CMake…(item-02)
step 01: Create a new project or use existing project.
step 02: Create a folder named “cpp” under src/main.
step 03: Create the C/C++ file “native-lib.cpp” under “cpp” folder. And add the following content to it:
- “Java_com_shishirstudio_ndktest_MainActivity_stringFromJNI”: represents the Java code with package name “com.shishirstudio.ndktest” [ dot(.) must be replaced with underscore(_)]followed by Activity name “MainActivity” where we want to call the native function and the static method “stringFromJNI” to fetch the API key from the native function. So the combination is:< Package Name>_
_
Now the directory looks like below…

step 04: Create a CMake build script CMakeLists.txt under app folder ( This is a plain text file that you must name CMakeLists.txt ) and add the following content to it.
Step 05: Now, our C/C++ native files and Java code are ready. But to compile or make the native build using NDK, we need to add entry into the gradle file:
Step 06: To use this API follow the step 05,06 and 07 of item-01.
***** The easiest and best way*****
In the newer updates of Android Studio its very easy because everything will be ready for you automatically. Just follow the below step:-
step 01: Enable “include C++ support” while taking a new project in android studio.
Источник